
Goal: Make a circuit that reliably produces a high voltage trigger in order to drive a triggered spark gap tube
Specifications:
Amplitude and pulse frequency must be programmable
Controller Build:
Python Script:
controls the pulsed output of an Arduino Uno. Will open a pop up window titled “Pulse Controller Tool” and have a little symbol of an atom in the upper left corner. There will be three user inputs and four buttons. The user inputs will be “Pulse Width” (which will control the pulse width of an Arduino Uno’s output “Number of Pulses” (which will control how many pulses the arduino uno sends out overall) and “PULSE Frequency” (which will control how quickly Arduino sends these pulses out. Have it so the program automatically connects to the COM port the arduino is connected to.
The buttons will be labeled
“CHARGE” (which sets a different pin to output high)
“FIRE” which will begin the output specified by the user inputs,
“SAFE MODE” (which will cancel the output and pull that other charge pin of the Arduino Uno to LOW).
Arduino Script (using Arduino IDE):
// Pin that outputs the pulse train.const int PULSE_PIN = 9;// Pin controlled by LOAD and SAFE.const int LOAD_PIN = 8;// If true, stop generating pulses.<br>bool stopFlag = false;// ==========================================================// Runs once when the Arduino powers on.// ==========================================================void setup(){ // Configure both pins as outputs. pinMode(PULSE_PIN, OUTPUT); pinMode(LOAD_PIN, OUTPUT); // Start with everything LOW. digitalWrite(PULSE_PIN, LOW); digitalWrite(LOAD_PIN, LOW); // Open serial communications. Serial.begin(115200);}// ==========================================================// Runs forever.// ==========================================================void loop(){ // Did the computer send us anything? if (Serial.available()) { // Read one entire line. String cmd = Serial.readStringUntil('\n'); cmd.trim(); // ----------------------------------------- // LOAD command // ----------------------------------------- if (cmd == "LOAD") { digitalWrite(LOAD_PIN, HIGH); } // ----------------------------------------- // SAFE command // ----------------------------------------- else if (cmd == "SAFE") { stopFlag = true; digitalWrite(PULSE_PIN, LOW); digitalWrite(LOAD_PIN, LOW); } // ----------------------------------------- // RUN command // Example: // // RUN,100,20,5 // // pulse width = 100 ms // pulses = 20 // frequency = 5 Hz // ----------------------------------------- else if (cmd.startsWith("RUN")) { stopFlag = false; // Find the commas. int c1 = cmd.indexOf(','); int c2 = cmd.indexOf(',', c1+1); int c3 = cmd.indexOf(',', c2+1); // Convert the text into numbers. float pulseWidth = cmd.substring(c1+1,c2).toFloat(); int numberPulses = cmd.substring(c2+1,c3).toInt(); float frequency = cmd.substring(c3+1).toFloat(); // Calculate one full pulse period. // // Example: // 5 Hz // // period = 1000/5 = 200 ms float period = 1000.0 / frequency; // Generate all requested pulses. for(int i=0;i<numberPulses;i++) { // Check if SAFE was pressed while running. if(Serial.available()) { String s = Serial.readStringUntil('\n'); if(s=="SAFE") stopFlag=true; } if(stopFlag) break; // Turn pulse output ON. digitalWrite(PULSE_PIN,HIGH); // Keep it HIGH for the pulse width. delay((int)pulseWidth); // Turn pulse OFF. digitalWrite(PULSE_PIN,LOW); // Wait until the next pulse. int offTime = period-pulseWidth; if(offTime>>>>0) delay(offTime); } // Always finish LOW. digitalWrite(PULSE_PIN,LOW); } }}
Python Script (p_controller_tool.py)
Bash:
pip install pyserial
# Import the Tkinter library to build the GUI window.import tkinter as tk# Used for pop-up error messages.from tkinter import messagebox# Library for communicating with the Arduino through USB Serial.import serial# Used to search for available COM ports.import serial.tools.list_ports# Used to wait a couple seconds while the Arduino resets.import time# Used for storing user input valuesimport jsonimport os# ==========================================================# Function: find_arduino()## Searches all COM ports looking for an Arduino.## Returns something like:# COM4# COM7## Returns None if nothing is found.# ==========================================================def find_arduino(): ports = serial.tools.list_ports.comports() # Look through every serial port connected to the PC. for port in ports: desc = port.description.lower() # Official Arduino boards if "arduino" in desc: return port.device # Arduino clones often use CH340 chips. if "ch340" in desc: return port.device # Generic USB Serial devices. if "usb serial" in desc: return port.device return None# Global variable that stores the serial connection.arduino = None# ==========================================================# Connect to Arduino# ==========================================================def connect(): global arduino # Search for the Arduino. port = find_arduino() if port is None: messagebox.showerror( "Connection Error", "Could not automatically find Arduino." ) return try: # Open the serial connection. arduino = serial.Serial( port, 115200, timeout=1 ) # Give the Arduino time to reboot. time.sleep(2) status.config( text=f"Connected to {port}", fg="green" ) except Exception as e: messagebox.showerror( "Connection Error", str(e) )# ==========================================================# LOAD button## Sends the text:## LOAD## to the Arduino.## The Arduino responds by setting the LOAD pin HIGH.# ==========================================================def load(): if arduino: arduino.write(b"LOAD\n")# ==========================================================# SAFE button## Sends:## SAFE## Arduino immediately stops pulsing and sets LOAD LOW.# ==========================================================def safe(): if arduino: arduino.write(b"SAFE\n")# ==========================================================# CONTINUE button## Reads the three text boxes.## Builds a command like:## RUN,100,25,5## meaning## 100 ms pulse width# 25 pulses# 5 Hz## Then sends it to the Arduino.# ==========================================================def run(): if arduino is None: return try: width = float(width_entry.get()) pulses = int(number_entry.get()) freq = float(freq_entry.get()) command = f"RUN,{width},{pulses},{freq}\n" arduino.write(command.encode()) except: messagebox.showerror( "Input Error", "Please enter valid numbers." )# ==========================================================# Save the current GUI values to a configuration file# ==========================================================CONFIG_FILE = "controller_config.json"def save_config(): config = { "pulse_width": width_entry.get(), "num_pulses": number_entry.get(), "frequency": freq_entry.get() } try: with open(CONFIG_FILE, "w") as f: json.dump(config, f, indent=4) messagebox.showinfo( "Configuration Saved", "Current settings have been saved." ) except Exception as e: messagebox.showerror( "Save Error", str(e) )# ==========================================================# Load saved configuration if it exists# ==========================================================def load_config(): if not os.path.exists(CONFIG_FILE): return try: with open(CONFIG_FILE, "r") as f: config = json.load(f) width_entry.delete(0, tk.END) width_entry.insert(0, config.get("pulse_width", "100")) number_entry.delete(0, tk.END) number_entry.insert(0, config.get("num_pulses", "10")) freq_entry.delete(0, tk.END) freq_entry.insert(0, config.get("frequency", "5")) except Exception as e: messagebox.showerror( "Load Error", str(e) )# ==========================================================# Build the GUI# ==========================================================root = tk.Tk()# Window titleroot.title("Pulse Controller Tool")# Window sizeroot.geometry("420x300")# Small atom icon (Unicode character)atom = tk.Label( root, text="⚛", font=("Arial",50))atom.place(x=10,y=5)# Window headingtitle = tk.Label( root, text="Pulse Controller Tool", font=("Arial",16,"bold"))title.pack(pady=10)# Holds all the text boxes.frame = tk.Frame(root)frame.pack(pady=10)# Pulse Width inputtk.Label( frame, text="Pulse Width (ms)").grid(row=0,column=0)width_entry = tk.Entry(frame,width=12)width_entry.insert(0,"100")width_entry.grid(row=0,column=1)# Number of Pulses inputtk.Label( frame, text="Number of Pulses").grid(row=1,column=0)number_entry = tk.Entry(frame,width=12)number_entry.insert(0,"10")number_entry.grid(row=1,column=1)# Frequency inputtk.Label( frame, text="Pulse Frequency (Hz)").grid(row=2,column=0)freq_entry = tk.Entry(frame,width=12)freq_entry.insert(0,"5")freq_entry.grid(row=2,column=1)# ==========================================================# Button row# ==========================================================buttons = tk.Frame(root)buttons.pack(pady=20)# LOAD button# Sends the LOAD command to the Arduino, which sets the# LOAD_PIN HIGH.tk.Button( buttons, text="CHARGE", width=12, bg="#87CEFA", # Light BLUE command=load).grid(row=0, column=0, padx=5)# CONTINUE button# Reads the user inputs and sends a RUN command to the Arduino.tk.Button( buttons, text="FIRE", width=12, bg="#FF7F7F", # Light Red command=run).grid(row=0, column=1, padx=5)# SAFE button# Immediately stops the pulse sequence and sets the LOAD pin LOW.tk.Button( buttons, text="SAFE", width=12, bg="#90EE90", # Light Green command=safe).grid(row=0, column=2, padx=5)# SAVE CONFIG button# Saves user inputstk.Button( buttons, text="Save Config", width=12, bg="#FFD966", # Light yellow command=save_config).grid(row=0, column=3, padx=5)# Connection status messagestatus = tk.Label( root, text="Searching for Arduino...")status.pack()# Load previously saved settings.load_config()# Connect automatically.connect()# Start the GUI event loop.root.mainloop()
Now making it an executable program on windows:
Install PyInstaller (Bash)
python -m pip install pyinstaller
cd path\to\your\script
pyinstaller --onefile --windowed your_script.py
add icon
pyinstaller --onefile --windowed --icon=iconName.ico main.py
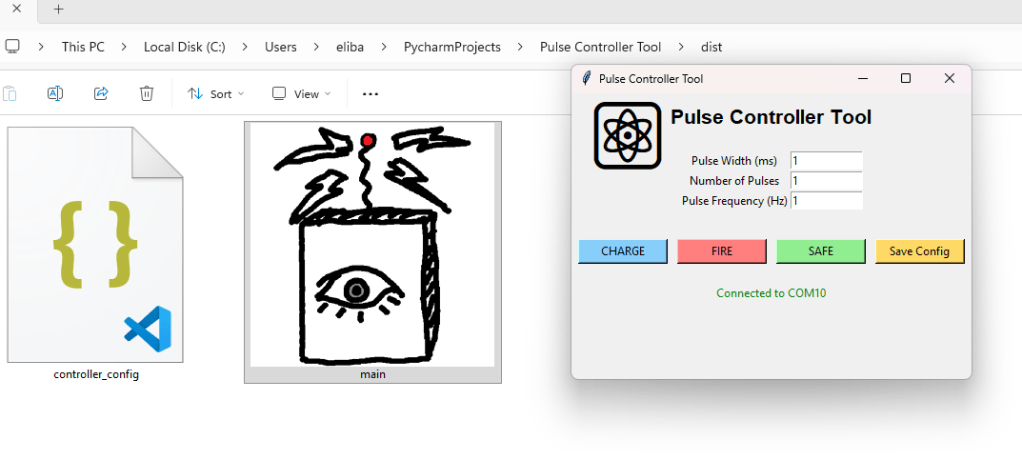
code for raspberry pi OS (Replaced the arduino autodetect with manual COM entry due to my cyberdeck having two arduinos connected at all times).
```python# Import the Tkinter library to build the GUI window.import tkinter as tk# Used for pop-up error messages.from tkinter import messagebox# Library for communicating with the Arduino through USB Serial.import serial# Used to wait a couple seconds while the Arduino resets.import time# Used for storing user input values.import jsonimport os# ==========================================================# Global variable that stores the serial connection.# ==========================================================arduino = None# ==========================================================# Connect to Arduino## The user manually enters the COM port in the COM Port# field, for example:## COM4# COM7## The program does NOT automatically search for the Arduino.# ==========================================================def connect(): global arduino # Get the COM port entered by the user. port = com_entry.get().strip() # Make sure the user entered something. if not port: messagebox.showerror( "Connection Error", "Please enter a COM port.\n\nExample: COM4" ) return try: # Close an existing connection if one exists. if arduino is not None and arduino.is_open: arduino.close() # Open the serial connection using the manually # entered COM port. arduino = serial.Serial( port, 115200, timeout=1 ) # Give the Arduino time to reboot. time.sleep(2) status.config( text=f"Connected to {port}", fg="green" ) except Exception as e: arduino = None status.config( text="Not connected", fg="red" ) messagebox.showerror( "Connection Error", f"Could not connect to {port}.\n\n{e}" )# ==========================================================# LOAD button## Sends the text:## LOAD## to the Arduino.## The Arduino responds by setting the LOAD pin HIGH.# ==========================================================def load(): if arduino is not None and arduino.is_open: arduino.write(b"LOAD\n") else: messagebox.showwarning( "Not Connected", "Please connect to the Arduino first." )# ==========================================================# SAFE button## Sends:## SAFE## Arduino immediately stops pulsing and sets LOAD LOW.# ==========================================================def safe(): if arduino is not None and arduino.is_open: arduino.write(b"SAFE\n") else: messagebox.showwarning( "Not Connected", "Please connect to the Arduino first." )# ==========================================================# CONTINUE button## Reads the three text boxes.## Builds a command like:## RUN,100,25,5## meaning:## 100 ms pulse width# 25 pulses# 5 Hz## Then sends it to the Arduino.# ==========================================================def run(): if arduino is None or not arduino.is_open: messagebox.showwarning( "Not Connected", "Please connect to the Arduino first." ) return try: width = float(width_entry.get()) pulses = int(number_entry.get()) freq = float(freq_entry.get()) command = f"RUN,{width},{pulses},{freq}\n" arduino.write(command.encode()) except ValueError: messagebox.showerror( "Input Error", "Please enter valid numbers." )# ==========================================================# Save the current GUI values to a configuration file# ==========================================================CONFIG_FILE = "controller_config.json"def save_config(): config = { "com_port": com_entry.get(), "pulse_width": width_entry.get(), "num_pulses": number_entry.get(), "frequency": freq_entry.get() } try: with open(CONFIG_FILE, "w") as f: json.dump(config, f, indent=4) messagebox.showinfo( "Configuration Saved", "Current settings have been saved." ) except Exception as e: messagebox.showerror( "Save Error", str(e) )# ==========================================================# Load saved configuration if it exists# ==========================================================def load_config(): if not os.path.exists(CONFIG_FILE): return try: with open(CONFIG_FILE, "r") as f: config = json.load(f) # Load saved COM port. com_entry.delete(0, tk.END) com_entry.insert( 0, config.get("com_port", "") ) # Load saved pulse width. width_entry.delete(0, tk.END) width_entry.insert( 0, config.get("pulse_width", "100") ) # Load saved number of pulses. number_entry.delete(0, tk.END) number_entry.insert( 0, config.get("num_pulses", "10") ) # Load saved frequency. freq_entry.delete(0, tk.END) freq_entry.insert( 0, config.get("frequency", "5") ) except Exception as e: messagebox.showerror( "Load Error", str(e) )# ==========================================================# Build the GUI# ==========================================================root = tk.Tk()# Window title.root.title("Pulse Controller Tool")# Window size.root.geometry("500x360")# ==========================================================# Small atom icon# ==========================================================atom = tk.Label( root, text="⚛", font=("Arial", 50))atom.place(x=10, y=5)# ==========================================================# Window heading# ==========================================================title = tk.Label( root, text="Pulse Controller Tool", font=("Arial", 16, "bold"))title.pack(pady=10)# ==========================================================# Connection frame# ==========================================================connection_frame = tk.Frame(root)connection_frame.pack(pady=5)# COM Port label.tk.Label( connection_frame, text="COM Port").grid( row=0, column=0, padx=5)# COM Port input.com_entry = tk.Entry( connection_frame, width=12)com_entry.grid( row=0, column=1, padx=5)# Connect button.tk.Button( connection_frame, text="Connect", width=12, bg="#B4C7E7", command=connect).grid( row=0, column=2, padx=5)# ==========================================================# Holds all the pulse settings.# ==========================================================frame = tk.Frame(root)frame.pack(pady=10)# ==========================================================# Pulse Width input# ==========================================================tk.Label( frame, text="Pulse Width (ms)").grid( row=0, column=0)width_entry = tk.Entry( frame, width=12)width_entry.insert( 0, "100")width_entry.grid( row=0, column=1)# ==========================================================# Number of Pulses input# ==========================================================tk.Label( frame, text="Number of Pulses").grid( row=1, column=0)number_entry = tk.Entry( frame, width=12)number_entry.insert( 0, "10")number_entry.grid( row=1, column=1)# ==========================================================# Frequency input# ==========================================================tk.Label( frame, text="Pulse Frequency (Hz)").grid( row=2, column=0)freq_entry = tk.Entry( frame, width=12)freq_entry.insert( 0, "5")freq_entry.grid( row=2, column=1)# ==========================================================# Button row# ==========================================================buttons = tk.Frame(root)buttons.pack(pady=20)# ==========================================================# LOAD button## Sends the LOAD command to the Arduino, which sets the# LOAD_PIN HIGH.# ==========================================================tk.Button( buttons, text="LOAD", width=12, bg="#87CEFA", command=load).grid( row=0, column=0, padx=5)# ==========================================================# CONTINUE button## Reads the user inputs and sends a RUN command to the Arduino.# ==========================================================tk.Button( buttons, text="Continue", width=12, bg="#FF7F7F", command=run).grid( row=0, column=1, padx=5)# ==========================================================# SAFE button## Immediately stops the pulse sequence and sets the LOAD pin# LOW.# ==========================================================tk.Button( buttons, text="SAFE", width=12, bg="#90EE90", command=safe).grid( row=0, column=2, padx=5)# ==========================================================# SAVE CONFIG button## Saves the COM port and user inputs.# ==========================================================tk.Button( buttons, text="Save Config", width=12, bg="#FFD966", command=save_config).grid( row=0, column=3, padx=5)# ==========================================================# Connection status message# ==========================================================status = tk.Label( root, text="Enter a COM port and click Connect.", fg="black")status.pack()# ==========================================================# Load previously saved settings.## This does NOT automatically connect to the saved COM port.# The user must still click Connect.# ==========================================================load_config()# ==========================================================# Start the GUI event loop.# ==========================================================root.mainloop()```
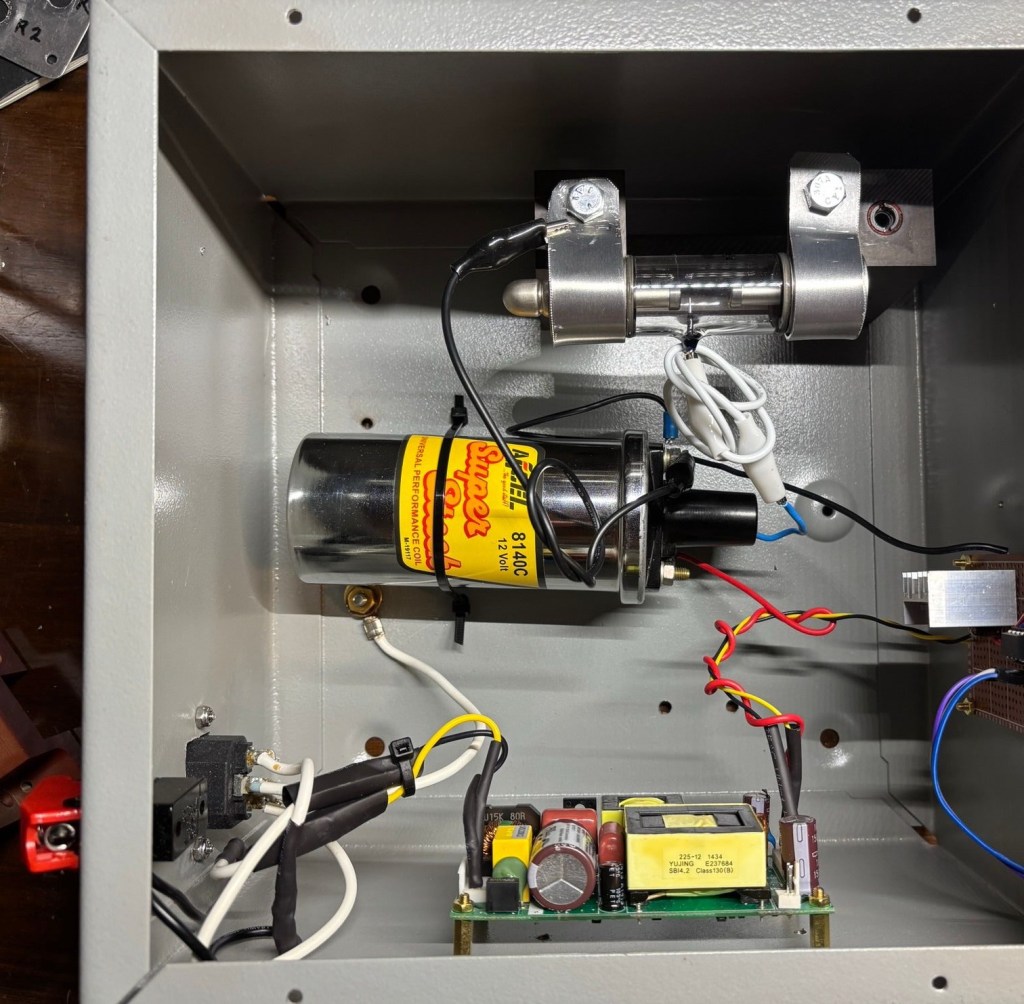
Hardware:
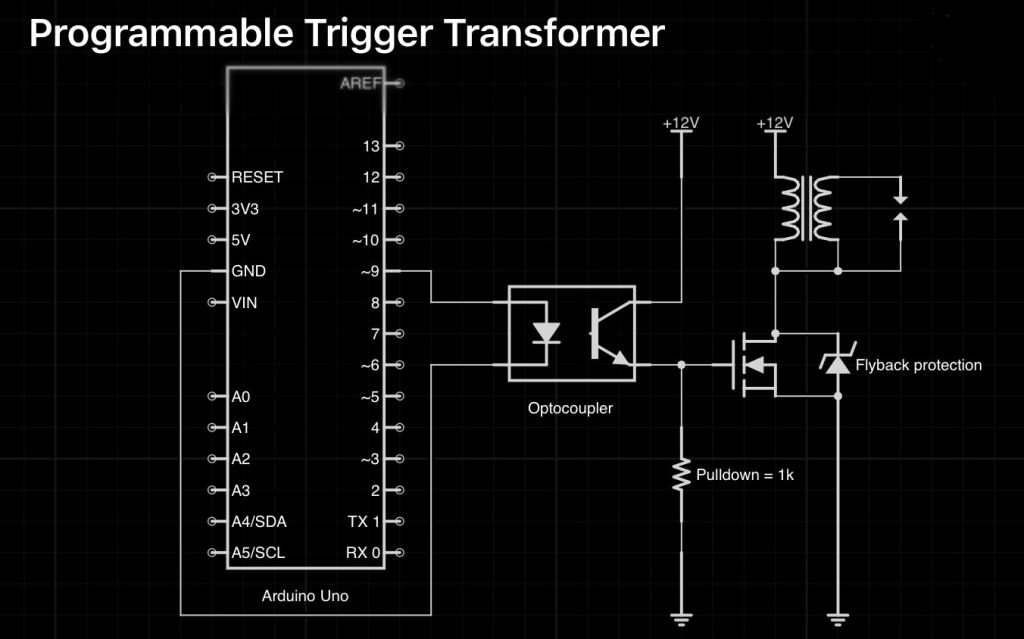
Schematic high-level:
When I have some time I will build hardware for the SAFE command:
General Schematic for safety interlock:
 Eli Bartlit
Leave a comment